Week 3 - Asset Modelling
- Feb 3, 2017
- 2 min read
I wanted to learn how to create assets for my game at an early stage. A main feature of my game would be the animals and their behaviour. I have no prior experience in modelling and believe it would give me a great opportunity to learn how to model my own assets and animations for my project. I started by finding a side-on 2D image of the desired animal and imported it into Blender.

I then added 2D planes to the image, following the outline of the model.

This was followed by extending the model on the x-axis to create a 3D image of the model. I used Blender’s Loop Subdivide (Ctrl-R) to divide the model into two in order to create a section for the legs and body of the animal. It was a challenge to extrude legs in 3D as I had to work with 3D faces.
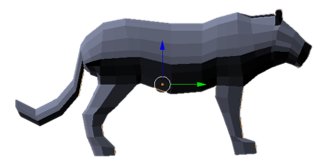
I had to be cautious not move certain faces as I would mirror the model on the x axis where one side of the model needed to be flat. Below is the model with its head and legs, mirrored on the x axis to create a basic shape.

I used the Loop Subdivide tool to add faces to the model in order to give it a low poly effect. It was difficult to create the faces for the head and underside of the model as I did not have a referencing image for those sides. However, I finally got a suitably sculpted model.

I now needed to rig my model. I used Blender to do this. I added the parent bone and connected it to the legs and body.


I used Ctrl-P to set the rig to be the child of the model and set the rig to use automatic weights. However, when testing movement, bones addressed the wrong parts of the model. Researching this problem, I realised that the weights were set to move incorrect parts of the model. Using Blenders custom bone weighting system (Ctrl-Tab when selecting a bone and the model itself) I was able to manipulate the weighting of each bone within the model. This gave the desired movement of the model.

Next I created the animations. Taking note of the real life movement behaviours of the animal by watching videos (both walking and running), I recreated this in Blender. In reality, the legs of the animal moved at different times and it took a lot of trial and error to get it looking semi realistic. I ended up disconnecting the bones which were connected to the body. This gave me more flexibility to move the legs independently.
Once I was happy with the animations, I created a UV map of the model and Unwrapped it in edit mode by pressing ‘U’. I imported the model into blender and attached a Zebra texture to the model.
I did the same process again for the player’s lion character. However, this time I used ‘face mode’ and Blender’s inbuilt colouring feature to colour the individual faces of the model. This process can be seen below:
2D character image

Created 3D model
Front view

Rigging the model. I animated Idle, Walking and running states

Final improved model using a custom colour palate for texturing in Blender


Comments